¶ Zabbix Enviando Emails Profissionais Atraentes
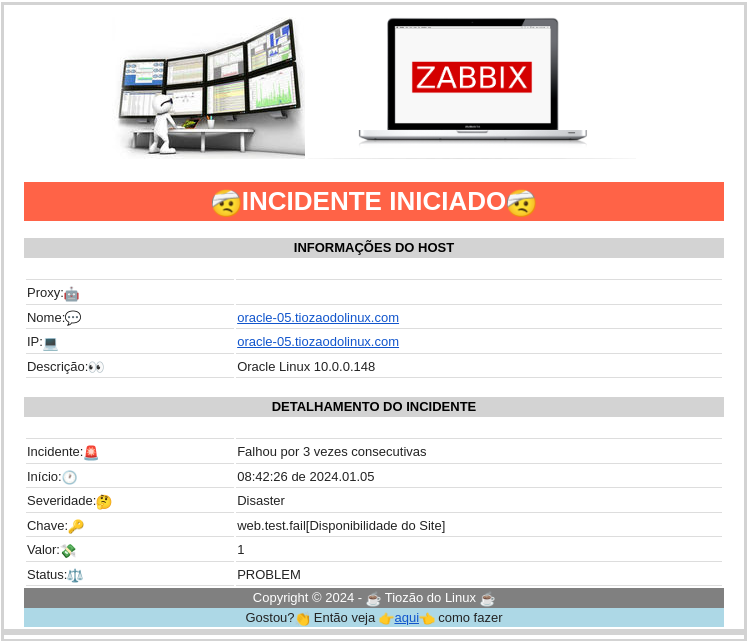
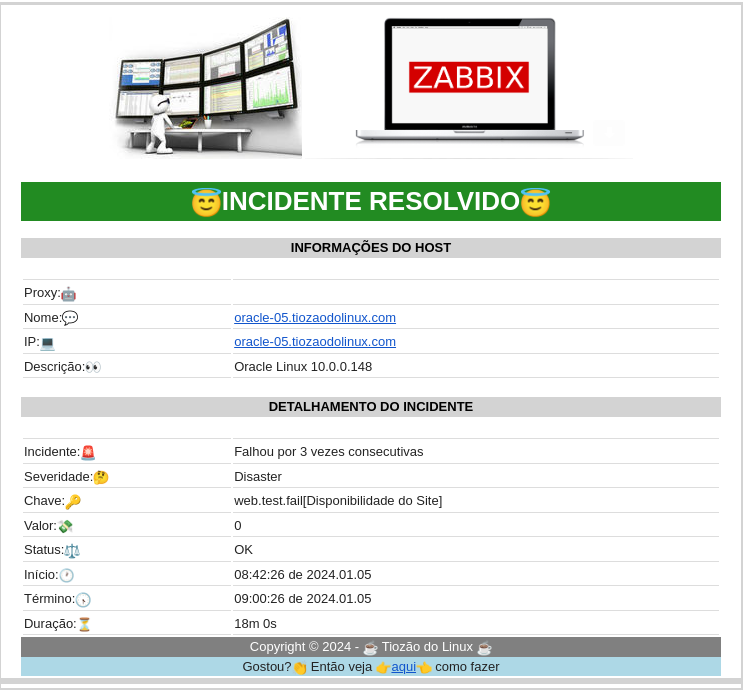
¶ Uma degustação de como pode ficar o alerta
| O alerta do ⛔ PROBLEMA ⛔ no momento do incidente | O alerta de ✅ OK ✅ depois que o incidente foi resolvido |
|---|---|
 |
 |
¶ Configuração do Zabbix
Os menus do Zabbix 6.0 e 6.4 são um pouco diferentes, mas as telas são equivalentes.
O envio de emails pelo Zabbix é bastante simples de ser configurado como podemos observar em https://www.zabbix.com/documentation/current/en/manual/config/notifications/media/email.
Na versão 6.4 tornou-se possível utilizar de forma mais simples o Gmail/Office365 como origem. Para utilizar o Gmail é necessário fazer login com senhas de app conforme descrito em https://support.google.com/accounts/answer/185833?hl=pt-BR
¶ Media Type
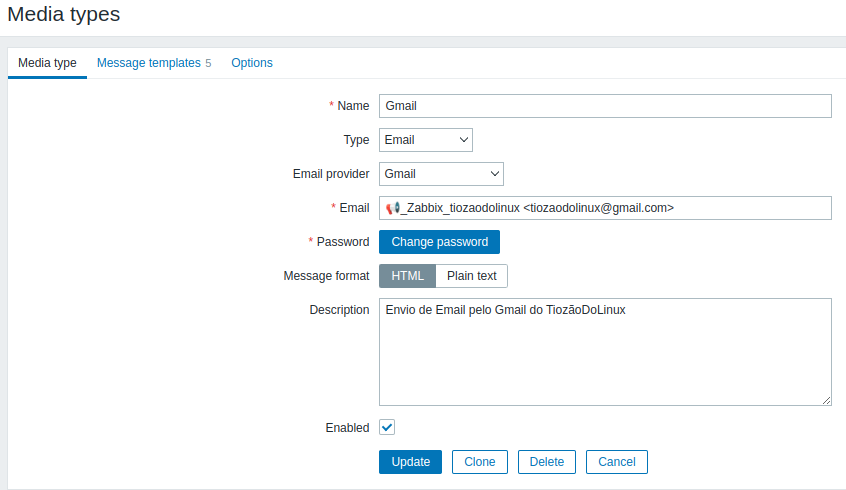
É necessário criar o Tipo de Mídia para o script ser executado.
Zabbix 6.0 -> Administration -> Media types -> Create media type
Zabbix 6.4 -> Alerts -> Media types -> Create media type
| Media type Observar Type e Email provider |
 |
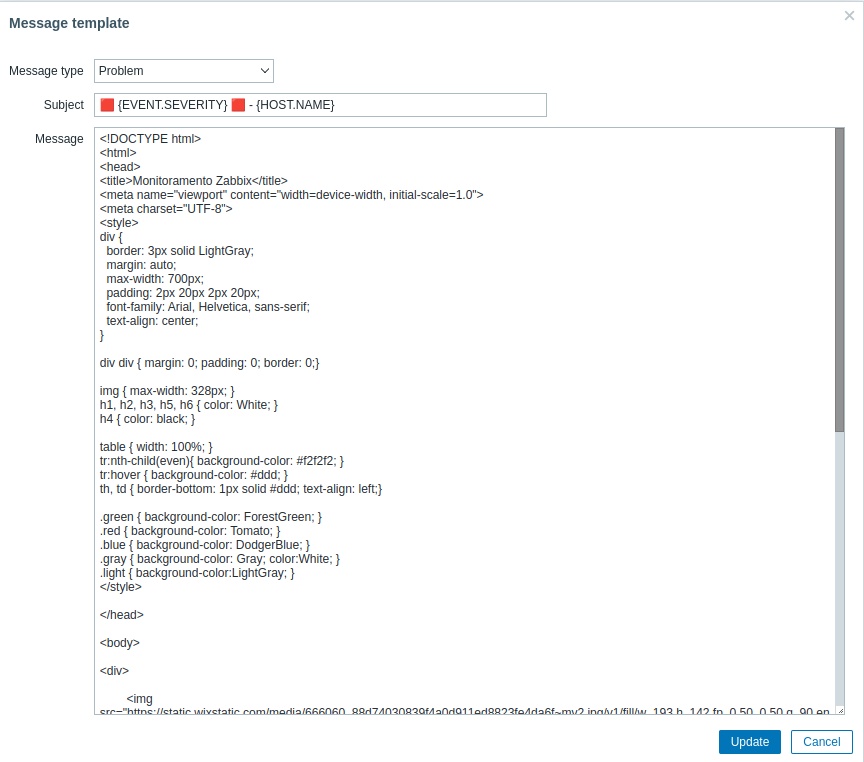
| Message templates Observar os tamplates |
 |
| Problem Message template de Problem |
 |
| Problem recovery Message template de Recovery |
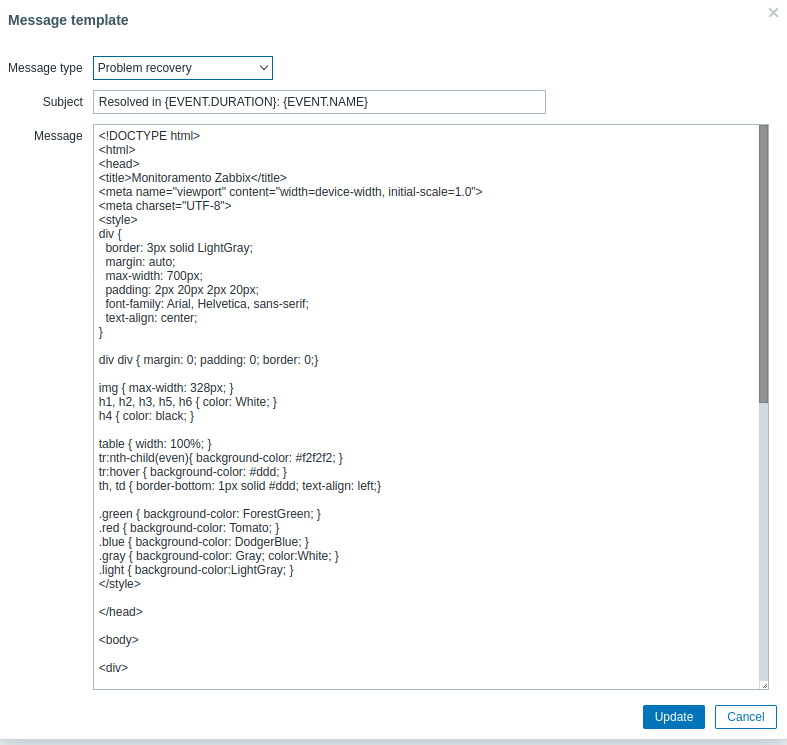 |
HTML para Problem - 🤗 para facilitar o CTRL+C
⛔️ {TRIGGER.STATUS} ⛔️ - {HOST.NAME}
<!DOCTYPE html>
<html>
<head>
<title>Monitoramento Zabbix</title>
<meta name="viewport" content="width=device-width, initial-scale=1.0">
<meta charset="UTF-8">
<style>
div {
  border: 3px solid LightGray;
  margin: auto;
  max-width: 700px;
  padding: 2px 20px 2px 20px;
  font-family: Arial, Helvetica, sans-serif;
  text-align: center;
}

div div { margin: 0; padding: 0; border: 0;}

img { max-width: 328px; }
h1, h2, h3, h5, h6 { color: White; }
h4 { color: black; }

table { width: 100%; }
tr:nth-child(even){ background-color: #f2f2f2; }
tr:hover { background-color: #ddd; }
th, td { border-bottom: 1px solid #ddd; text-align: left;}

.green { background-color: ForestGreen; }
.red { background-color: Tomato; }
.blue { background-color: LightBlue; }
.gray { background-color: Gray; color:White; }
.light { background-color:LightGray; }
</style>

</head>

<body>

<div>

    <img src="https://static.wixstatic.com/media/666060_88d74030839f4a0d911ed8823fe4da6f~mv2.jpg/v1/fill/w_193,h_142,fp_0.50_0.50,q_90,enc_auto/666060_88d74030839f4a0d911ed8823fe4da6f~mv2.jpg" alt="Logo" />
    <img src="https://1.bp.blogspot.com/-VUC2tZtSNIs/WHPq4a1ZWXI/AAAAAAAAB4c/k9GTiD6VHR0UZ3jaVPF4V6CGkPrkNmkGACEw/s1600/instalacao-zabbix.png" alt="Logo" />

    <div class="red"><h1>🤕INCIDENTE INICIADO🤕</h1></div>

    <div class="light"><h4>INFORMAÇÕES DO HOST</h4></div>

    <table>
      <tr><td style="width:30%"> </td>  <td> </td></tr>
      <tr><td>Proxy:🤖</td>       <td>{PROXY.NAME}</td></tr>
      <tr><td>Nome:💬</td>        <td>{HOST.NAME}</td></tr>
      <tr><td>IP:💻</td>          <td>{HOST.CONN}</td></tr>
      <tr><td>Descrição:👀</td>   <td>{HOST.DESCRIPTION}</td></tr>
    </table>

    <div class="light"><h4>DETALHAMENTO DO INCIDENTE</h4></div>

    <table>
      <tr><td style="width:30%"> </td>  <td> </td></tr>
      <tr><td>Incidente:🚨</td>   <td>{EVENT.NAME}</td></tr>
      <tr><td>Início:🕐</td>      <td>{EVENT.TIME} de {EVENT.DATE}</td></tr>
      <tr><td>Severidade:🤔</td>  <td>{TRIGGER.SEVERITY}</td></tr>
      <tr><td>Chave:🔑</td>       <td>{ITEM.KEY}</td></tr>
      <tr><td>Valor:💸</td>       <td>{ITEM.VALUE}</td></tr>
      <tr><td>Status:⚖️</td>      <td>{TRIGGER.STATUS}</td></tr>
    </table>

</div>

<div class="gray">Copyright © {{TIME}.fmttime(%Y)} - ☕ Tiozão do Linux ☕</div>
<div class="blue">Gostou?👏 Então veja <a href="https://wiki.tiozaodolinux.com">👉aqui👈</a> como fazer</div>

</body>
</html>
HTML para Recovery - 🤗 para facilitar o CTRL+C
✅ {TRIGGER.STATUS} ✅ - {HOST.NAME}
<!DOCTYPE html>
<html>
<head>
<title>Monitoramento Zabbix</title>
<meta name="viewport" content="width=device-width, initial-scale=1.0">
<meta charset="UTF-8">
<style>
div {
  border: 3px solid LightGray;
  margin: auto;
  max-width: 700px;
  padding: 2px 20px 2px 20px;
  font-family: Arial, Helvetica, sans-serif;
  text-align: center;
}

div div { margin: 0; padding: 0; border: 0;}

img { max-width: 328px; }
h1, h2, h3, h5, h6 { color: White; }
h4 { color: black; }

table { width: 100%; }
tr:nth-child(even){ background-color: #f2f2f2; }
tr:hover { background-color: #ddd; }
th, td { border-bottom: 1px solid #ddd; text-align: left;}

.green { background-color: ForestGreen; }
.red { background-color: Tomato; }
.blue { background-color: LightBlue; }
.gray { background-color: Gray; color:White; }
.light { background-color:LightGray; }
</style>

</head>

<body>

<div>

  <img src="https://static.wixstatic.com/media/666060_88d74030839f4a0d911ed8823fe4da6f~mv2.jpg/v1/fill/w_193,h_142,fp_0.50_0.50,q_90,enc_auto/666060_88d74030839f4a0d911ed8823fe4da6f~mv2.jpg" alt="Logo" />
  <img src="https://1.bp.blogspot.com/-VUC2tZtSNIs/WHPq4a1ZWXI/AAAAAAAAB4c/k9GTiD6VHR0UZ3jaVPF4V6CGkPrkNmkGACEw/s1600/instalacao-zabbix.png" alt="Logo" />

  <div class="green"><h1>😇INCIDENTE RESOLVIDO😇</h1></div>

  <div class="light"><h4>INFORMAÇÕES DO HOST</h4></div>

  <table>
     <tr><td style="width:30%"> </td>  <td> </td></tr>
     <tr><td>Proxy:🤖</td>       <td>{PROXY.NAME}</td></tr>
     <tr><td>Nome:💬</td>        <td>{HOST.NAME}</td></tr>
     <tr><td>IP:💻</td>          <td>{HOST.CONN}</td></tr>
     <tr><td>Descrição:👀</td>   <td>{HOST.DESCRIPTION}</td></tr>
  </table>

  <div class="light"><h4>DETALHAMENTO DO INCIDENTE</h4></div>

  <table>
     <tr><td style="width:30%"> </td>  <td> </td></tr>
     <tr><td>Incidente:🚨</td>   <td>{EVENT.NAME}</td></tr>
     <tr><td>Severidade:🤔</td>  <td>{TRIGGER.SEVERITY}</td></tr>
     <tr><td>Chave:🔑</td>       <td>{ITEM.KEY}</td></tr>
     <tr><td>Valor:💸</td>       <td>{ITEM.VALUE}</td></tr>
     <tr><td>Status:⚖️</td>      <td>{TRIGGER.STATUS}</td></tr>
     <tr><td>Início:🕐</td>      <td>{EVENT.TIME} de {EVENT.DATE}</td></tr>
     <tr><td>Término:🕟</td>     <td>{EVENT.RECOVERY.TIME} de {EVENT.RECOVERY.DATE}</td></tr>
     <tr><td>Duração:⏳</td>     <td>{EVENT.DURATION}</td></tr>
  </table>
</div>

<div class="gray">Copyright © {{TIME}.fmttime(%Y)} - ☕ Tiozão do Linux ☕</div>
<div class="blue">Gostou?👏 Então veja <a href="https://wiki.tiozaodolinux.com">👉aqui👈</a> como fazer</div>

</body>
</html>
DICA: Para facilitar as alterações, abra https://www.w3schools.com/html/tryit.asp?filename=tryhtml_default e cole o HTML acima no lado esquerdo e veja a mágica acontecer do lado direito.
¶ Actions
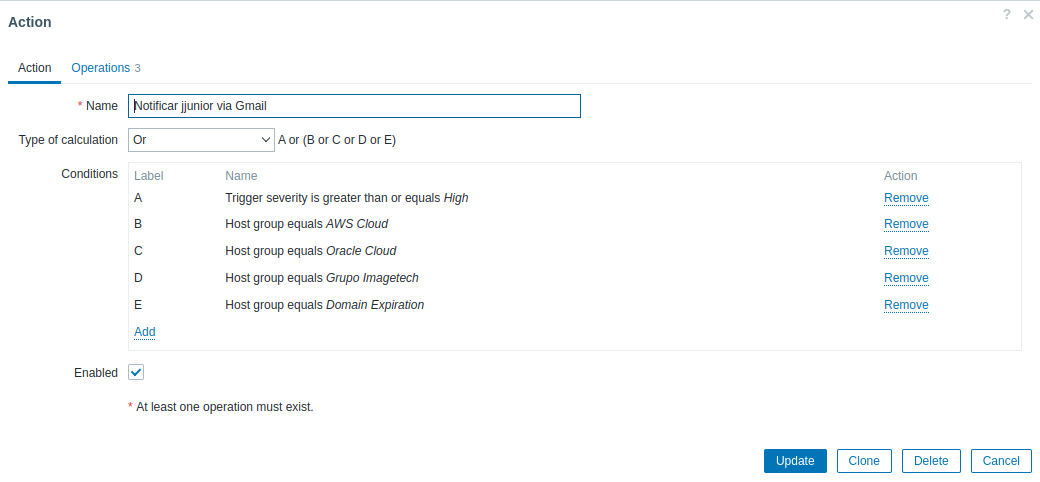
É preciso configurar as Ações a serem executadas num incidente.
Zabbix 6.0 -> Configuration -> Actions -> Triger Actions -> Create Action
Zabbix 6.4 -> Alerts -> Actions -> Triger Actions -> Create Action
| Action Escolha as Conditions que melhor convier |
 |
| Operations | 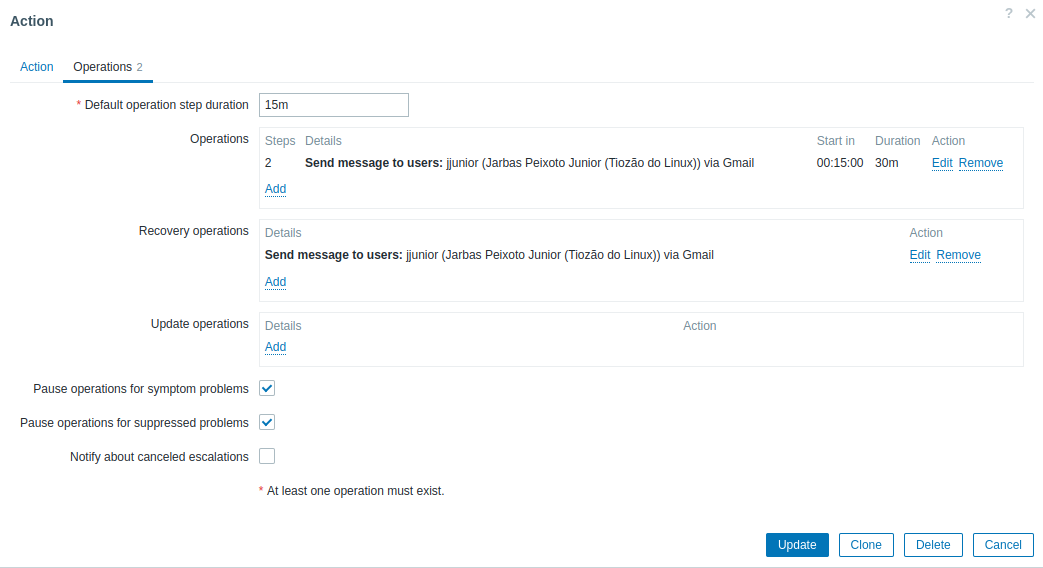 |
| Operations Details Problem | 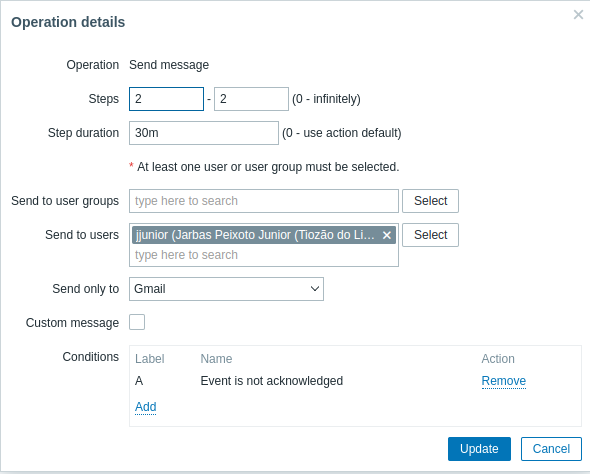 |
| Operations Details Recovery | 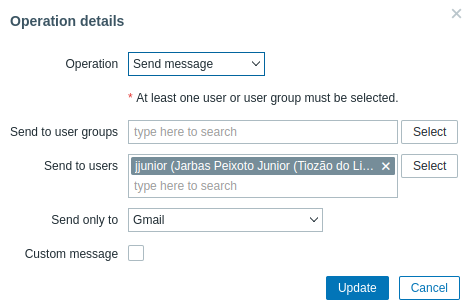 |
¶ Users
É preciso configurar o tipo de Mídia do usuário que será alertado.
Zabbix 6.0 -> Administration -> Users
Zabbix 6.4 -> Users -> Users
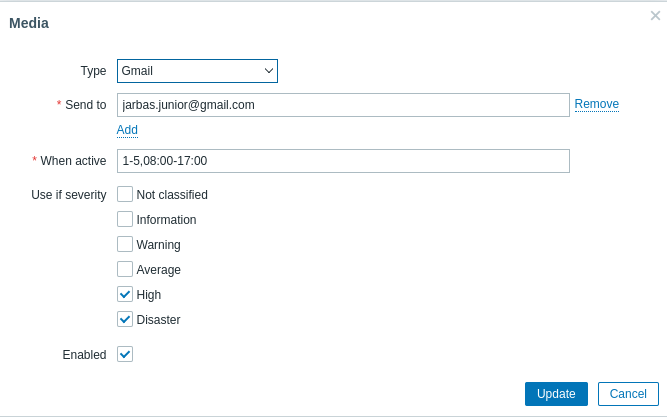
Para dirimir dúvidas e/ou sugestões entre no Grupo Tiozão do Linux
Gostou? Então não deixe de assistir ao vídeo onde explico melhor essa implementação.
https://www.youtube.com/watch?v=BojECMqH_wM
¶ Referências
- Origem onde tudo começou - https://www.zabbix.com/forum/zabbix-cookbook/413606-coloured-html-email-notification-templates
- Primeira implementação dessa idéia - https://github.com/JulioZanette/zabbix-html-email-template
- Media Types - https://www.zabbix.com/documentation/current/en/manual/config/notifications/media
- Macros do Zabbix - https://www.zabbix.com/documentation/current/en/manual/config/macros
- Triggers do Zabbix - https://www.zabbix.com/documentation/current/en/manual/config/triggers/trigger
- Integração do Zabbix com o Email - https://www.zabbix.com/documentation/current/en/manual/config/notifications/media/email
- 📢 Emojis 😱 para copiar ⛔ e colar ✅ - https://emojikeyboard.top/pt/
- Utilizando gmail como origem do email - https://support.google.com/accounts/answer/185833?hl=pt-BR
